Saturday, July 30, 2022

Modern Controllers for Retro Gaming

I do a lot of “retro” gaming, having grown up with and owned everything form the Atari 2600 to the PlayStation 2 before moving all my gaming exclusively onto PC. Today, I do all my old school gaming via Steam, GoG, or emulation on my Windows PC, Raspberry Pi 3B+ units, and the Pi 4 B 8GB. I’m in no way a “purist” when it comes to the game and hardware, but one thing I consider a must is a proper selection of quality controllers.

In my quest to emulate the golden age of gaming from my childhood, I use a varied set of controllers, using the 8-BitDo wired SNES style controllers for a vast majority of my needs, and they’re fantastic! For my more specific needs, I picked up the Retro-Bit Official Sega Genesis 8-Button controller, a Hori Official TurboGrafx-16/PC Engine controller (that I also use for NES and Master System), a Hyperkin Trooper II, and a MayFlash F101 Arcade Stick. With this set of controllers, I can comfortably play anything from the golden age of gaming through today.

 So, lets take a look at each one and why I recommend them...


Buy: https://amzn.to/3cSGiFD

I own a couple modern Atari 2600 replica controllers that are left over from when I had all my Atari Flashback units, and I did use them from time to time via a USB adapter, but when I moved most of my classic console emulation over to the Raspberry Pi, I just used the thumb-sticks on the 8-BitDo SNES controllers when I played around with classic Atari titles. Then one day I decided to try the MayFlash F101, and that made me realize how much I actually missed using a real joystick, so I went shopping for a quality USB Atari 2600 style joystick that would fit well into my collection.

I quickly found the Hyperkin Trooper II. I seen that it got generally good reviews, and I know the Hyperkin name from their awesome classic console replicas, but it was sold out at the time. I told my wife I was looking at getting one, and it happened to be close to my birthday, so she watched and when they were back in stock, she bought me one. 


At the time of this review, I have had it over a year, and it’s held up wonderfully. It feels like a quality Atari controller, is easily picked up by Windows 10, Ubuntu 20.04, Raspberry Pi OS, and RetroPie, and has more than enough buttons for the sake of convenience.

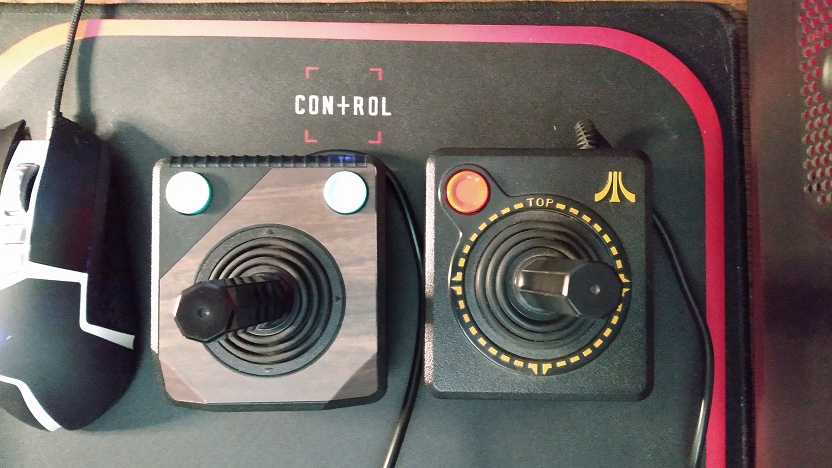
This is not a micro-switch controller, but instead uses quality membrane style contacts to read your inputs. From the attached photos, you can see the joystick uses a 4 contact pad similar to most all other game pads, it reliably registers 8 different positions, the 4 primary directions (up, down, left, right), and the 4 points between the primary directions (up+right for example). This means it’s perfect for just about anything that plays best with a classic joystick input. 

The internals and everything else seem to be well made, and the membrane pads are better quality than I have seen in many other “cheap” joysticks. It also pays to note that the joystick itself can be removed (as seen in the photos) and is interchangeable with old Atari Flashback controllers with the same style joystick. So, if it happens to break on you, this gives you an option for replacing it. Though after over a year of relatively consistent use, mine is still going strong. 


Overall, this is a fantastic controller from a reputable company, and is one of the few quality options on the market fitting the Atari 2600 style.  


Buy: https://amzn.to/3oNcUTH

One of the other controllers 1990’s me really enjoyed using was for the Sega Genesis, so when I went looking for a modern USB remake, I decided to go with the officially licensed offering from Retro-Bit, a trusted name in retro gaming world. 


This Official 8-button Genesis USB controller from Retro-Bit feels great, is recognized in Windows, Ubuntu 20.04, Raspberry Pi OS, and RetroPie, and is an overall great quality product. Many of my reviews are generally a bit more in-depth, but in this case the best thing I can say about this controller is that it works and feels great! It’s held up to quite a bit of use so far, and it’s a must for anyone looking to emulate that classic feeling from one of the best consoles to ever be released. Yes, there are cheaper options, but after going down that path a few times, I can honestly say you’re much better off buying a quality product from a reputable company. It will often save you money and frustration in the long run. 


Buy: https://amzn.to/3SdQDvP

With companies like 8-BitDo, Retro-Bit, Hori, and Hyperkin being my go to when I’m in need of a new controller, when I decided I wanted to buy an arcade stick for old school arcade emulation, that’s where I looked first, and that lead me to the 8-BitDo Arcade Stick. An awesome high quality arcade stick that looks a lot like a modern version of the NES Advantage on steroids. The NES Advantage was one of my all time controllers, so the 8-BitDo Arcade Stick was what I initially looked into buying. The problem was price. At $90+, it’s pushing well over what I wanted to spend for a arcade stick that would only get moderate usage at best, only when I wanted to play very old school arcade style games, and would never be used for modern fighting games or anything else for that matter. So, I did some more digging.


During that search I ran across MayFlash, a company I had never heard of before, but who I quickly found out made exactly what I was looking for. They make a wide range of arcade sticks in a wide range of prices, and they use quality parts. They’re also user serviceable and upgradable should you so desire. From there I found the F101, pretty much their entry level arcade stick. Not only did it get good reviews, but it fit both my needed and budget perfectly. 


While the F101 doesn’t use Sanwa buttons, they are still high quality and are still working perfectly after quite a bit of use. I use it mainly on my Windows PC and RetroPie on a Pi 3B+, and in both cases it works perfectly. There is nothing like playing classic arcade titles on a proper microswitch stick with actual arcade style buttons! For under $50 you get a high quality arcade stick that’s actually comfortable to play on and holds up well to the abuse often associated with this style of gaming.

In short, if you’re in the market for a quality inexpensive arcade stick that can easily be upgraded or repaired, then you really don’t need to look any further than the F101 from MayFlash. At this price point, there really isn’t much out there with this level of quality.


Buy: https://amzn.to/3JldvFY

The next controller on my list isn’t necessarily a “must have”, but it’s great if you do a lot of NES, Sega Master System (SMS), and TurboGrafx-16/PC Engine emulation, and that’s the Official USB TurboGrafx-16 Mini Controller from Hori. The TG-16 was one of my all time favorite consoles, I was lucky enough to own one back in 1989 and it’s the console that really hooked me on scrolling shooter games.

One thing I really liked about the TG-16, other than its awesome graphics, sound, and game library, was its controllers. I really enjoyed the rounded NES style and the addition of turbo fire selectors for both the A and B buttons. The rounded design made them more comfortable to hold for long periods of time over NES controllers and often made me wish Nintendo had made that design choice.

I used to own a couple nice NES style USB controllers I used for my 2-button console emulation, but after buying this Hori TG-16 Mini controller, the NES remakes found themselves in the back of the drawer. This controller is perfect for any console that uses 2-button controls, is very comfortable and well built, and even though turbo fire options are available in most all emulation software, having it in the hardware is vastly more convenient.

In short, this one controller now handles all my NES, SMS, TG-16, and most handheld console games. With countless hours of use it’s still holding up perfectly, it’s comfortable during long game sessions, and it’s just a joy to play on because it “feels” the part so well. Like I said above, it’s not a necessity, but it’s definitely nice to have.


Buy: https://amzn.to/3vqWwfk

I saved the best for last, and that’s because these 8-BitDo SN30 Pro wired USB controllers have quickly became my top choice for far more than just Super NES emulation. If I had to rank my all-time favorite controllers across all consoles, then the top two spots would be held by the Super NES and Sony PlayStation 2. I found both of those controllers to be the more comfortable and convenient styles for my hands. For many years, all of the controllers I used on PC were SNES or PS2 inspired.

Now, I know a lot of people really like the layout and design of Xbox controllers, but to put it bluntly, I never liked it. It’s the same for the Nintendo 64, if I had to rank my least favorite controllers of all time, then the N64 and Xbox would be the bottom two on that list. Neither controller ever felt all that comfortable in my hands, and while I did play a lot on the N64 back in the day and learned to tolerate the controls, I never owned an Xbox so that controller never had a chance with me.

Fast forward to today and we have somewhat of a hybrid design with the SN30 Pro, SNES design with PS2 style thumb stick placement and dual L&R triggers. For me, this is the perfect controller design and is what I used across all other platforms where I don’t use a system specific controller, including on PC. I do a lot of “rerto” and platformer gaming on PC, where I enjoy modern remakes of classic titles as well as modern games inspired by the classics, and the SN30 Pro from 8-BitDo is the controller I use for all of it.

The two that I own have been seen a lot of use since I bought them in 2020 and are always sitting on my desk. They still play and look like they did they day I got them even though they get used several times a week. 8-BitDo offers a few different styles with this controller, but I went with the standard wired USB simply because I am one of those old farts who just can’t stand wireless controllers. For an old guy like me, these controllers are as good as it gets, a blend of classic and more modern designs that fills just about all the gaps when you’re trying to emulate so many systems from years gone by, as well as play modern games that scratch that retro itch. 


I will close by saying that if you’re in the market for one controller to rule them all, and you’re like me and really don’t care for more modern designs, then the SN30 controller is where you should start looking. I may have an OCD when it come to controllers, but these can easily handle just about every platform with ease and comfort, and if I had to cut my controller collection down to just one, this would be that one.


Friday, July 29, 2022

Cheapest "Quality" NES/8-Bit Knockoff Handheld Emulator on Amazon (JAMSWALL)

Buy:
https://amzn.to/3OMo4Tk

In my effort to explore the world of super cheap emulation, I decided to start with the cheapest handheld “8-Bit” emulator I could find on Amazon, and that lead me to this “JAMSWALL Handheld Game Console” that boasts a list of “400 Classical FC Games” and a price tag of only $16 at the time of purchase. By “FC” they mean “Famicom”, or as we know it here in the US, the Nintendo Entertainment System. This is simply a way to avoid drawing attention to the fact these units contain licensed games. They either abbreviate, or simply fail to mention this fact completely. Even going to far as to blur out some of their own advertising images on US listings.

Note: The JAMSWALL name is one of those nonsensical "company" names you see all over Amazon and Wish. Don't put much stock in the name, that was simply the cheapest offering at the time of purchase. These sellers come and go all the time and will popup under many names to avoid negative feedback or legal action. 

This unit features a bright color display with a 2.8 inch viewable area, decent responsive controls, and a volume dial. It also comes with a rechargeable 800mAh battery, micro USB power/charging cable, and a micro USB controller for 2 player games. You also have the ability to hook the device up to your TV via an included RCA adapter cable.

Let me start off by saying I was shocked by the quality of this knockoff handheld considering the price. While it does feel cheap and lightweight, it’s actually really sturdy. The buttons feel good in my big hands, the screen is bright and easy to see, and the sound is not nearly as bad as I was expecting. The game selection was also really decent, even with the obligatory inclusion of mostly knockoff, fake, and repeating titles.

Here is a list of the well-known “legit” NES titles I recognized that are included in this unit. This is NOT a full or complete list, just the games that I know and have tested.


  1. Super Mario Bros.
  2. Super Mario Bros. 3
  3. Dr. Mario
  4. Mario Bros. (The Original)
  5. Teenage Mutant Ninja Turtles (Some text not in English)
  6. TMNT Tournament Fighter
  7. Contra (Has 24 different versions, included some with cheats active, including 30 lives.)
  8. Contra Force
  9. Jackal
  10. Rush N Attack
  11. Adventure Island 1 & 2
  12. Chip and Dale’s Rescue Rangers (Some text not in English)
  13. Bubble Bobble Part 2
  14. Ninja Gaiden 2 (Some text not in English)
  15. Double Dragon 2 & 3 (Double Dragon 3 - Text not in English)
  16. Robocop
  17. SpiderMan
  18. 10-Yard Fight
  19. The Legend of Kage
  20. Balloon Fight
  21. Bomberman
  22. Burger Time
  23. Clu Clu Land
  24. Defender II (Listed as Defender)
  25. Dig Dug 1 & 2 (Dig Dug II is misspelled as Gig Dug2 in the menu)
  26. Donkey Kong, Donkey Kong Jr., and Donkey Kong 3
  27. Excitebike
  28. Galaga
  29. Galaxian
  30. Ice Climber
  31. Joust
  32. Lode Runner
  33. Millipede
  34. Pac-Man
  35. Popeye
  36. 1942
  37. Arkanoid
  38. Pac-Land
  39. Spy vs Spy
  40. Xevious
  41. Friday the 13th
  42. Back to the Future
  43. Paperboy
  44. Tiger Heli
  45. Mappy
  46. Nintendo Pinball
  47. F1 Race

A vast majority of the other included games are cheap unknowns, rip-offs, or not in English. Just about all of the legit games listed above are repeated at least once. Still, with roughly 50+ legit games, the asking price of under $20 is a pretty good deal in my opinion. There are many hours of entertainment to be had, and since these don’t cost that much, they’re great for “on the go” gaming for all ages. If they break or get lost, you’re not out much and they’re easily replaced. 

Screenshots captured directly from the included AV output on the device.

There are a few cons I need to mention, other than the lackluster menu system and 350 or so “fake” and repeated games added, that you should keep in mind.
  1. While the screen brightness starts off very bright, as the 800mAh battery starts to die, the screen will get progressively darker. However, if you plug it into any power source, such as a portable battery pack or phone charger, it goes back to full brightness as it charges.

  2. Some legit games are not in English (as listed above), and many of the “fake” games are also not in English. In the above screenshots for example, the second row first image is actually "Teenage Mutant Ninja Turtles", the game dialog is in English, but the title is not. You'll also see that "Contra 24in1" is just Contra with 24 different starting options, such as 30 lives or start on a different level with a different weapon, but each "version" is still just Contra, just with a different cheat or save-state enabled.

  3. Some games may appear to not work, just give them a moment to load. Friday the 13th for example can sometimes take a bit to load once you click start. Also, as the battery dies, load times may increase, and other issues may arise.

  4. Annoying menu screen music.

  5. Lastly, there are no advanced features found in more expensive units such as save states or the ability to use cheats like the Game Genie. You’re pretty much stuck playing the game as they were originally intended.

Even with these cons, I still think this is a nice little handheld emulator if you’re on a tight budget, or just want something to kill time, or for young kids, that you don’t have to worry about getting broken or lost. The legit games that are included seem to play fine and will provide many hours of entertainment. I suggest keeping an extra phone charger and/or portable power bank handy for long trips as the unit’s 800mAh battery won’t last anywhere near the listed 5 hours of playtime.

Overall, I can honestly say I like this cheap little handheld emulator. For such a low price you get a good selection of classic NES games packed into a decent quality handheld that’s easy on the wallet and better than many of the other handheld games you find sold in dollar stores across the US for around the same price, at least these have real classic NES games included, all be it of questionable legality.


Additional Information:

The unit will play just fine via USB power without a battery installed.

The 5 hour playtime listed on the product page is exaggerated with the included 800mAh battery, the screen on mine will begin to dim after between 1 and 2 hours of use on average and will die after about 3 hours of play. Considering the cost of this unit, that’s not terrible, but not the best either.

The included battery is 3.7V and rated at 800mAh. It’s a cheap no-name rechargeable BL-5C Li-ion Battery with a max charge voltage of 4.2V. There are better batteries available on Amazon should you want to “upgrade” to something better.

If you do choose to “upgrade” the battery, I recommend anything over 1500mAh for much better playtime, such as the one listed below from Amazon, under $10 for a pack of 2 batteries. This battery has been tested and works with the unit’s built-in charger. The great thing about BL-5C batteries is they are used in many common devices, so having an extra one or two on hand is not a bad idea, even if you don’t use one in this emulator. Also note that the higher capacity means it will take longer to charge as well.

https://www.amazon.com/BL-5C-Rechargeable-Household-Overcharge-Protection/dp/B08LST74YR/

This unit is most likely powered by an "NES-on-a-chip" (NOAC), located under the blob on the PCB. NOACs are very cheap and easy to produce and power most 8-Bit "Famiclone" devices on the market.You should checkout my page on the subject if you're planning on buying more of these units!

Internally, it uses a known flash memory chip found in many GameBoy Advance knockoff and "multi-game" cartridges (MXIC 29GL128EHMC-90G), meaning you may be able to hack it and alter the included ROM files. Something I may look into down the road. Here is the DATASHEET should you be interested.


Lastly, you will see many “8-bit” units that look like this one for sale on Amazon and elsewhere, and while the price may differ, they are all going to be nearly identical. A general rule when it comes to these knockoff handhelds is that they are often copies of copies. Chances are, the internal hardware will be nearly identical, if not completely identical. The software and included games may be different in some cases, but even then, that’s also likely the same. They may alter the appearance of the “front-end”, that being the game list that you see, but under the hood it’s all the same. So don’t get conned into buying a more expensive unit thinking you’re getting something of better quality. Before you buy, compare, read the reviews whenever they’re available, and look for pictures or videos of the unit’s you’re comparing if at all possible. Why spend more money for no good reason!

Wednesday, July 13, 2022

Paranormal Tool DIY - The REMPOD

A REMPOD is device that emits an electromagnetic field, and when that EM field is altered, emits sound and/or lights to indicate a disturbance in the force. If this sounds familiar, then perhaps you’re aware of a musical instrument known as a “Theremin” that does this very thing. Invented in 1920 by Leon Theremin, the player uses their hands to manipulate the EM field generated by the device to produce musical tones. Fast forward to the 21st century and this same concept has been adopted for paranormal research, branded as the “REMPOD”, and popularized by shows like Ghost Adventures.

Many of those in the paranormal community believe spirits have the ability to produce and manipulate electromagnetic fields, and that this would allow their presence to be detected using something like an EMF Meter. EMF Meters are a common tool used in many professions and have long been used in paranormal research as well, with the classic “K2” being one of the most popular for many years. The problem with an EMF Meter is it requires the presence of an EM field, so a spirit would have to generate one strong enough to register on the meter, and many of those in the community believe not all spirits are strong enough to do this. Enter the REMPOD.

Since a REMPOD is basically just a miniaturized modern Theremin, it produces its own EM field, and so it’s theorized a spirit can manipulate that EM field much easier than trying to produce one themselves. This would allow researchers to communicate with spirits, and detect their presence, much more reliably than with an EMF meter alone. At least, that’s the theory.

I’m a skeptic by nature, and while I find paranormal research fascinating and entertaining, my logical brain often gets in the way of actually believing the “evidence” often captured using devices like this. The thing about EMF fields is they exist everywhere, even in the absence of man made electrical devices, they’re produced by forces in the Earth and all around us, and in wildly varying intensities. EM fields are very easy to manipulate, they’re not all that stable in nature, and are subject to interference. Meaning that just because you detect a random EM field somewhere there is no electrical power, does not mean it’s a ghost. The same goes for a REMPOD, its own EM field can be interfered with and “detect” the presence of electromagnetic waves, but it can’t tell you where those waves are coming from. It could be from the Earth itself, the radios many investigators use, or even from sources outside the sphere of their investigation. Basically, our world is flooded with electromagnetic waves, so saying a detection by a device is a ghost just don’t sell it for me.

That all being said, many paranormal investigators use multiple different tools to try and collaborate what they see, hear, and detect. So, it’s really all down to what you believe. Personally, I don’t have to believe in it to think it’s cool and respect those who do. As well as those who are genuinely trying to prove the existence of the paranormal or help people.

Now, let’s get down to the REMPD itself. They have been around a while now, and have gone through changes and upgrades, but their all basically the same thing, a Theremin circuit. The original, as seen in the tear-down photo shared below from “Skeptical Enquirer”, is literally just a modified “Junior Theremin” DIY soldering kit from a company called MadLab. While some later versions are custom similar circuits, they all still do the same thing. Thankfully, these kits are still available for around $20 or less from various places, meaning you can modify one yourself to make your own custom REMPOD! 


Buy: https://amzn.to/3cPzIjh

This Theremin circuit is really simple, powered by a 555 timer and 12C508 micro-controller, supported by the necessary capacitors, resistors, a voltage regulator, LEDs, speaker, antenna, and power inputs. Meaning, it would be easy to duplicate using something like an Arduino or more common Atmel Micro-controller. MadLab even made the code on the 12C508 available for anyone to use, or modify, but that’s a bridge I will cross later. For now, we’ll stick with the original and modify it to fit our own design. I'm not trying to hide what's inside and I want it easy to duplicate. 


I wanted to keep our REMPOD prototype as small and portable as possible and have a simple on/off switch. I also want to keep it easy to service and modify later, so I won’t be encasing it in resin or glue, but I may use a little in the prototype to hold things in place.

One future alteration I will be making is a custom 3D printed housing, but since I haven’t designed one yet, a small basic project box will do for our prototype, and it will make it easier to design an enclosure later. With this in mind, I built the circuit, extended the LED, speaker, and power connections. Once I verified the circuit was working correctly, I made the necessary quick and dirty alterations to the project enclosure and crammed everything inside, using a bit of hot glue to keep things from moving around.


Now that our prototype is complete and fully functional, I can honestly say it seems to work quite well. My wife will be able to use her custom, and considerably cheaper, REMPOD to hunt ghosts. Along with the other tools I have made for her, she’s almost got as many tools as the pros on TV. She’s happy to have another tool for her hobby, and I’m happy to make them for her since that’s my hobby! 


Now, it's time to work on getting that custom enclosure designed and printed, it's almost done! Here is a snapshot of what I got so far. I'm new to 3D design, so I'm still getting the hang of it.


Tuesday, July 12, 2022

Cheap Small Form Factor Bench PC - The Zotac ZBox Nano P (CI320)


Buy: Zotac ZBox Nano P Cl320 on eBay

Over the past few years, I’ve went through 3 different setups for my “Bench Computer”. The system that I use to power by USB oscilloscope (Hantek 6022BE), Logic Analyzer (HiLetgo), as well as the necessary software, such as programming an Arduino or Ateml Chips, and designing my circuits and PCBs, etc.

In the beginning, I simply used my desktop PC, a Ryzen 5 based system. While it’s obviously convenient and powerful enough for the task, it comes with a couple drawbacks. For one, you’re tethered to wherever your desktop happens to be, they’re not exactly known for being portable. To clarify, I don’t want something designed for full portability, just something I can move around my workspace easily if necessary.

The second one for me was the risk of damage if I do something stupid. We all make mistakes, and what if something I do happens to fry my oscilloscope or other analytical device I have hooked into my PC, and that intern damages my very expensive PC? So I wanted to move away from using my desktop for that type of work. I also knew I wanted to keep it as inexpensive as reasonably possible.

I had considered just buying an old laptop, that solves both problems, but presents a couple more of its own. Used laptops with the necessary connectivity and power to do what I want are still relatively expensive, and while they are designed to be portable, they are still larger than what I want for my limited workspace, and I do 99% of my work at home so no need for that level of portability. Also, I wanted to be able to use a standalone monitor, my eyes aren’t getting any younger, I have no need for a built in display. So, the laptop idea was shot lived.

Next, I decided to try out the Raspberry Pi 4 B 8GB, an absolutely amazing little low power single board computer that has enough horsepower for most of what I want to do when it’s configured properly and supplied with the proper supporting hardware. I bought one and installed it in an Argon M.2 case, dropped in a 128GB SSD, and installed the latest Pi OS. It ticked almost all the boxes, it was small, as portable as I needed to be, and could run most of what I needed.

For a several months, that little Pi 4 did the job very well, but eventually two things started nagging at me. The first being that I wanted to use the Pi 4 for some different projects, and they had gotten nearly impossible to find, and you’ll notice I said it could run “most” of what I wanted it to do. The problem is, some software that I like to use just won’t run on the Pi because it’s an ARM based computer, and I simply do not have the skills to make them work on my own.

So I was pretty much left with just one other solution, a small form factor x86 based computer. I could still run my OS of choice, Ubuntu, but since it was x86, I would have no problems getting all the software I wanted to use up and running. With that in mind, I started shopping around online, and ran across the Atomic Pi. An x86 Intel Atom based single board computer that was originally designed to power a home robot that was ultimately never produced. I had never heard of the Atomic Pi, but I figured it would be fun to DIY my bench test computer, and if I liked the Atomic Pi, I could also use one for a special project I had been wanting to do, but that’s a different story.

The Atomic Pi has some short comings I had to work around, and you can check that out over on the AP’s project page, but in the end I managed to get it up and running Ubuntu and all the software I wanted. Again, I used it for a couple months, but again a couple problems ate away at my OCD. The most nagging to me was that by the time I had the project done, it grew into something considerably larger than the Pi 4 due to all the supporting “external” hardware needed to make up for the AP’s shortcomings. I needed to use a USB3 to SATA adapter so I could run the AP off an SSD instead of the limited 16GB of internal eMMC storage or a painfully slow SD card. I also had to wire in a 4 port USB hub to add connectivity so I could plug everything in. Lastly, I had to come up with a way to power the Atomic Pi. Once I got it all crammed into a case, it worked great, but was still larger than I wanted. The second issue was it’s limited 2GB of non-upgradable DDR3L RAM, though that was less of a concern considering the software I was running on it.

This is where the story comes full circle, after my OCD sent me down these various rabbit holes, I happened to notice you can pick up used SFF (Small Form Factor) PCs on eBay for around $50. Basically, laptop style hardware crammed into a tiny box, setup to run more like a desktop. I knew these existed, but I really never gave them much thought because I had always assumed they were all junk and never used them outside of work. I was never really impressed by them, but I figured maybe if I had one to play with and configure on my own, it should work for my needs. It would take me right back to a desktop PC, just a considerably smaller one.

So, after doing a lot of searching around, I settled on a used Zotac ZBox Nano P Ci320, an quad-core Intel Celeron based PC with ample USB connectivity, the ability use 2.5 inch SSDs, and can have up to 8GB of DDR3L RAM installed. It has a nice small footprint, about the size of a CD jewel case stacked 3 or 4 high, and can run absolutely everything I want with ease. It ticked every box!


So why share this long winded story? Just to say that even though I probably should have gotten to this destination a lot quicker, and that it should have been obvious to a hardcore computer geek like me, but it’s not always about the destination. Sometimes the journey is where all the fun and discovery is waiting to be had. I got to dive into the Raspberry Pi 4 and see what a wonderful little device it is. I discovered the Atomic Pi and found out it was the perfect fit for a special project I have been wanting to do for my wife. I also got to familiarize myself with Linux (Ubuntu), a skill that has been seriously lacking. Lastly, I finally got to give SFF PCs a fair shake, and not just think of them all as the crappy little computers many of us are stuck using at work. When configured properly, they are actually very capable little machines for a lot of workloads, including mine!

In the end, I got where I needed to be, I had fun, and I learned a lot along the way. That’s why I do many of the projects that I do, to learn and have fun, as with any hobby I find it relaxing, even if I do change my mind several times along the way.

Now, let’s take a look at the ZBox Nano Ci320 and see how I have it configured.


Zotac ZBox Nano P Ci320 Specs and Configuration


I picked my unit up for about $45, free shipping, on eBay. It appears to have been one of many that came as a bundle someone had bought as leftovers from a corporate upgrade. It’s common for companies to hire 3rd parties to come in and do system wide upgrades and then take all the old hardware off their hands. That old hardware is often sold off somewhere as bare-bones deals or refurbished machines. Mine came with a 2GB stick of RAM installed, no hard drive, no power supply, and no wi-fi antenna. Not a big deal since all of these things are still easily obtainable or I already had it on hand.

I happened to have an extra new 120GB Kingston SSD I had bought and never used, giving me more than enough space since all it’s running is Ubuntu and the software to power my test, design, and programming equipment.

I knew I could modify any decent 19V power brick to plug into the ZBox, as long as it can supply the amperage and watts needed to keep it stable. In my case I got a cheap 19V 3.42A 65W rated brick, soldered on the proper barrel jack, and used that to power the unit. I had previously powered the ZBox using my DIY bench power supply, and knew how much it actually drew and needed to be stable under load.


NOTE: I tested the power brick BEFORE using it to power the ZBox, just to ensure it wasn’t faulty so it wouldn’t damage the ZBox. It always good practice to test these cheap power supplies before you use them on anything of value. Mine was actually running a bit under 19V at 18.85, but that’s more than enough for this unit’s power demands.


Next, I picked up a cheap 8GB stick of Team Group DDR3L 1600 RAM to max out the systems supported memory. The installed 2GB that it came with was enough to get up and running, but I didn’t want to thrash the SSD using the swap file, so maxing it out to 8GB solves that problem and gives me the best performance possible. Also, I should note the units max support memory speed is 1333MHz, but 1600 RAM works fine of course, it will just run at 1333. 


Buy SSD: https://amzn.to/3zgua8R

Buy RAM: https://amzn.to/3bcxUjI

Finally, I installed Ubuntu 20.04 on the SSD, updated everything, then set about installing all my software and configuring it the way I wanted. It’s a snappy little system for what I am asking it to run. Software like OpenHantek6022, PulseView, EasyEDA, Fritzing, SDR++, ArduinoIDE, etc. As well as browsing the web, shopping, and watching videos as needed.


When it was all said and done, I ended up with was a nice small form factor computer that now handles all of my “hobby” work and testing, that meets all my criteria, and doesn’t trigger my OCD. It keeps my much more expensive desktop PC safe, and finally it opens up the Pi 4 and Atomic Pi for other projects, so it’s just a win all around.